
Deploying C2 Infra to Google Kube Engine (GKE)
In this post I’ll be going through the basics of command and control infrastructure, key components, and automated deployment of your C2 infrastruture. I’ll be doing this in Google Kubernetes Engine (GKE), though you’ll be able to deploy via any flavour of Kube, like Microk8s.
Overview of Common C2 Infrastucture
Typically, in a small test environment you’ll have a couple of virtualised target hosts, and the C2 server deployed on an adjacent network.
Depending on your test environment you also might be using domain names for your implants callback, rather than your C2’s IP address. Usually this is done via something like pfSense, or a simple /etc/hosts entry if you’re looking for the simplest method.
10.10.10.0/24                        172.16.0.1/24
------                                ------------
| C2 | <---- malware.moozle.wtf ----- | Infected |
------                                |   host   |
   ^                                  ------------
   |                               ------------
   | --------- 10.10.10.17 ------  | Infected |
                                   |   host   |
                                   ------------
A simple C2 setup
This kind of test environment is good for testing functionality, stability of new scripts, tooling, and detection. It doesn’t however let you accurately test what would happen if you started infecting hosts on the other side of the internet in your targets environment.
When deploying a production environment we want to add another layer into the diagram above to improve OpSec, and give us more flexibility with our deployment. For this we will use redirectors, these are responsible for separating our the callback domain on your C2, and the C2 server itself.
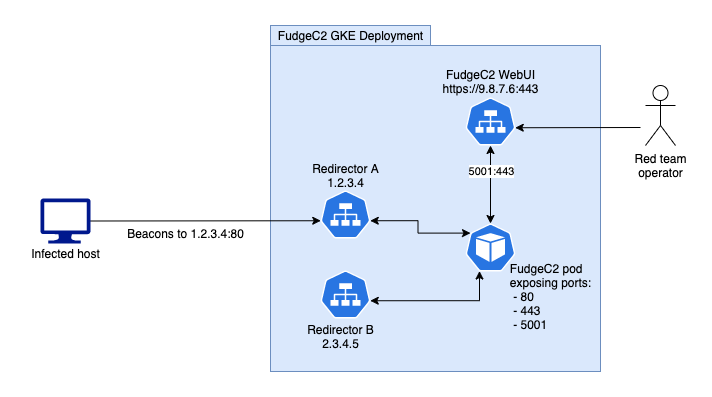
A C2 deployment using 2 redirectors.
Redirectors provide redteams with several benefits
-
If the blueteam identifies a malicious domain, any implant regardless of domain, will be flagged and blocked as they are sharing a single IP address. This means any low-and-slow backup implants will be detected as they will be calling back to the same IP as the identified domain.
-
You don’t want to have your WebUI running on the same address your listeners. Imagine the reaction of a blueteamer connecting to your WebUI mid redteam? Your covers been blown, and you’re going to be mockingly subtweeted at for the next week.
-
You can deploy redirectors in specific regions or clouds. This is a minor advantage that can support contractual requirements with your clients, or even edge-case objectives.
-
If you believe a tool/system has blacklisted your IP address rerolling your redirectors is incredibly easy and provides you with a fresh IP address. As we’ll see soon!
Deploying the FudgeC2 Server
For our C2 software we’re going to be using FudgeC2 as the C2 server, and for deployment we’ll be using GKE and kubectl.
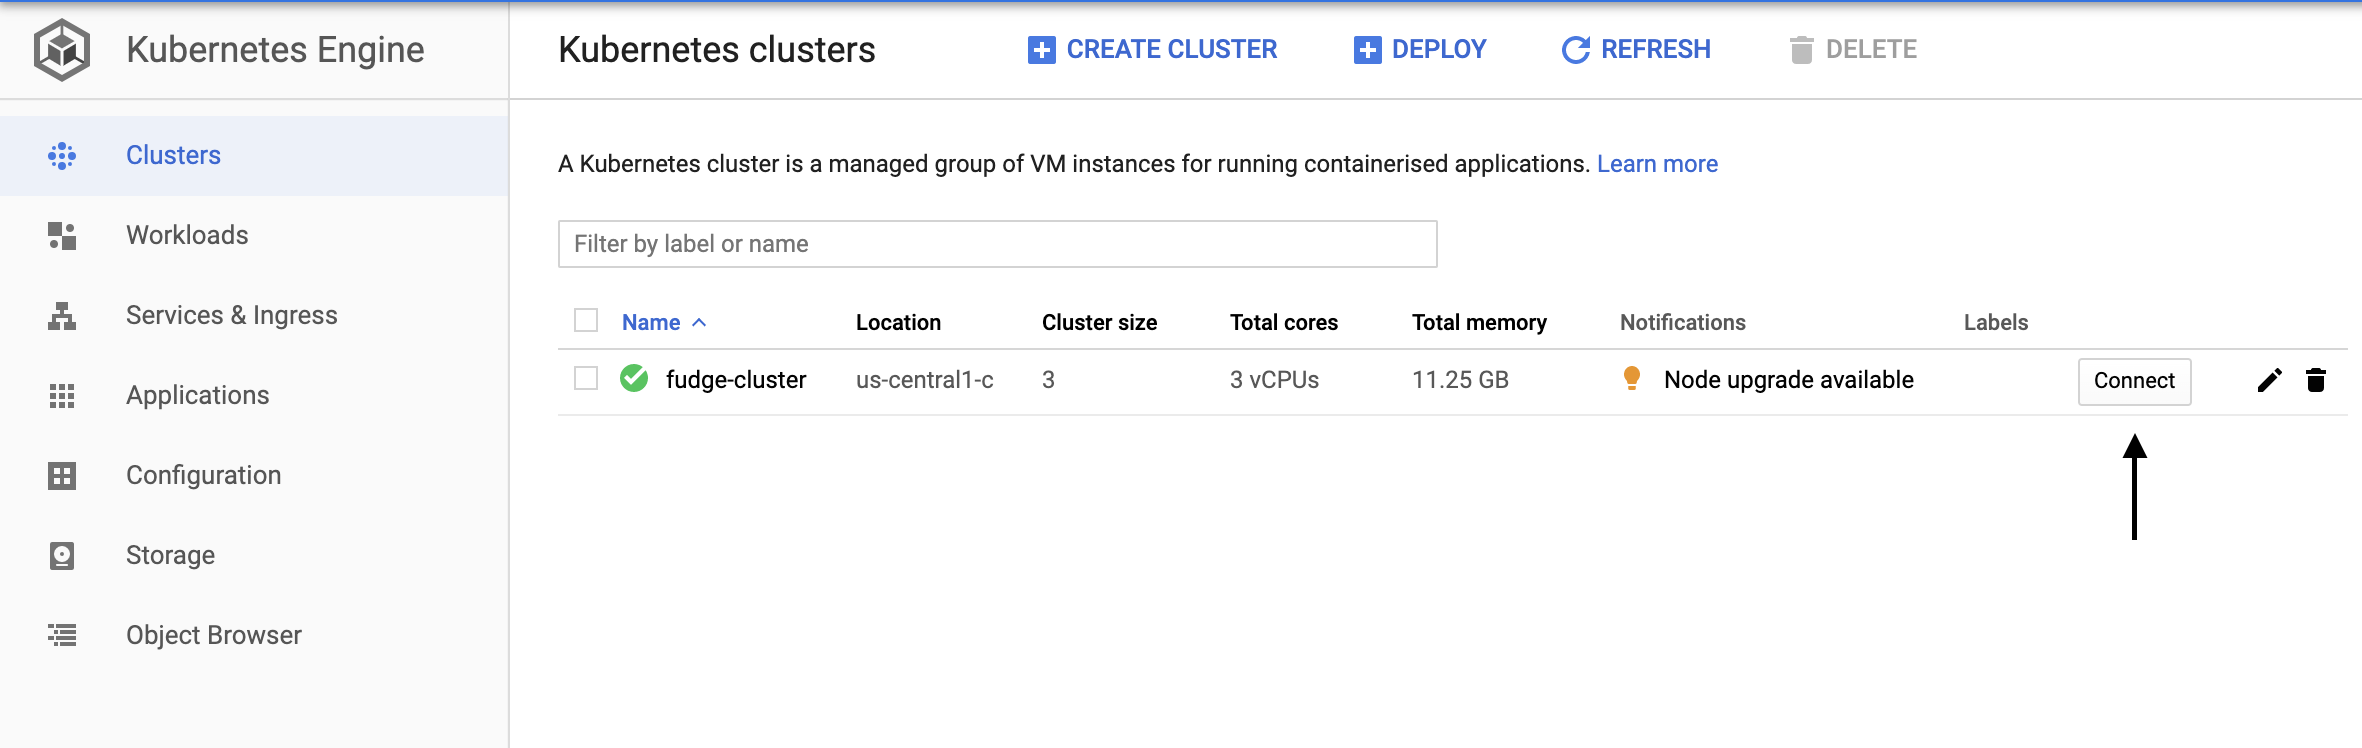
If you’ve never setup GKE you can find more information about setup in the Google cloud docs. For this post you’ll need to set up a new Kube cluster for the deployments.
We’re going to start by creating a Kube deployment which will consist of three services, and our C2 pod. We’ll be focused on the services throughout this post and not the server configuration, as the C2 used can be any C2 which has a docker image! For more information see the C2 Matrix.
Start by opening Cloudshell in your Google Cloud and connecting to your cluster. From here on we’ll be using the kubectl command for most things. To access your cloud shell create a Kube cluster, and then select the connect option, shown below.
Once we’re in cloudshell we need to create two files (deployment.yaml, and services.yaml), these files contain the data that kubectl will use to build our environments.
deployment.yaml
# Deployment of FudgeC2
apiVersion: apps/v1
kind: Deployment
metadata:
  name: fudgec2-deployment
  labels:
    app: fudge
spec:
  replicas: 1
  selector:
    matchLabels:
      app: fudge
  template:
    metadata:
      labels:
        app: fudge
    spec:
      containers:
        # Change the image tag if you want to use a different C2 framework.
        - name: fudge-c2-server
          image: ziconius/fudgec2:0.5.6
          ports:
            # Default FudgeC2 webUI port
            - containerPort: 5001
              name: webapp-access
            # We'll be configuring the following listeners on our
            #   C2 to communicate with our implants;.
            - containerPort: 80
              name: http-listener
            - containerPort: 443
              name: https-listener
If you’re looking to use a C2 framework other than fudge you need to change the image attribute to the relevant docker repository for your chosen framework.
services.yaml
apiVersion: v1
kind: Service
metadata:
  name: fudge-server-lb
  labels:
    app: fudge
spec:
  selector:
    app: fudge
  type: LoadBalancer
  ports:
  - port: 443
    targetPort: 5001
---
apiVersion: v1
kind: Service
metadata:
  name: listener-http
  labels:
    app: fudge
spec:
  selector:
    app: fudge
  type: LoadBalancer
  ports:
  - name: http
    port: 80
    targetPort: 80
  - name: https
    port: 443
    targetPort: 443
---
apiVersion: v1
kind: Service
metadata:
  name: listener-https
  labels:
    app: fudge
spec:
  selector:
    app: fudge
  type: LoadBalancer
  ports:
  - name: http
    port: 80
    targetPort: 80
  - name: https
    port: 443
    targetPort: 443
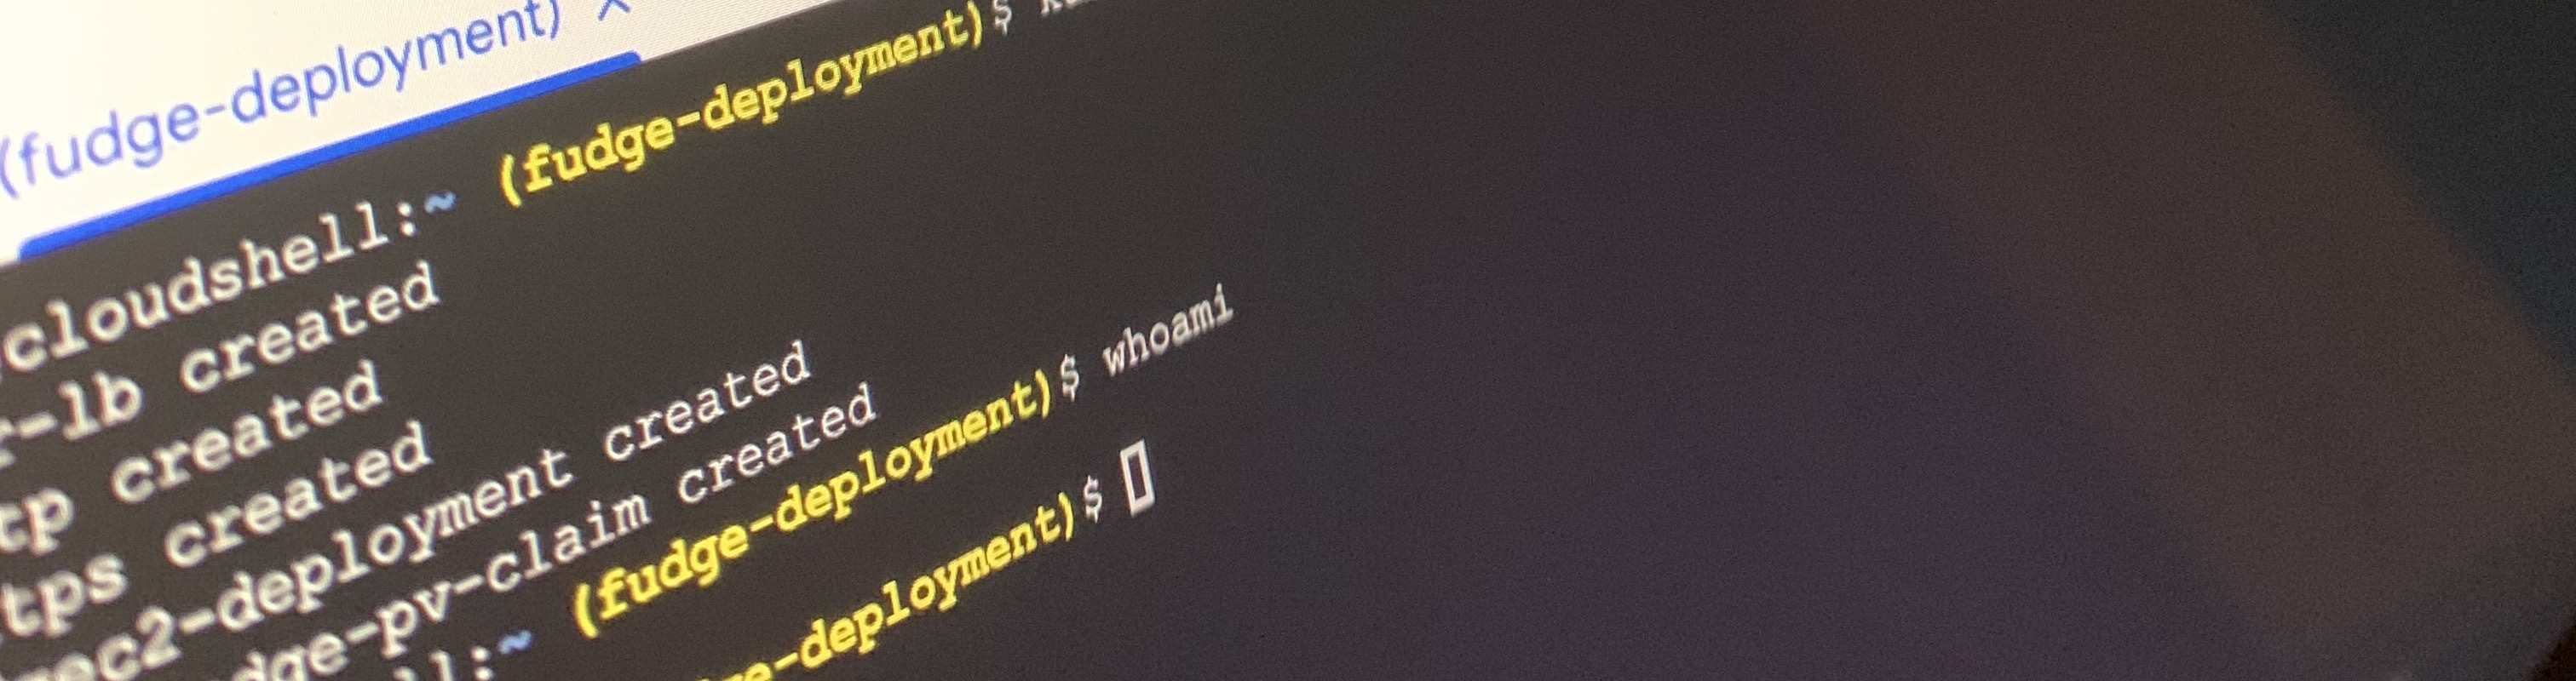
Now that we have these files inside our Cloudshell environment we run the following to deploy the code:
kubectl create -f deployment.yaml --dry-run=client
kubectl create -f services.yaml --dry-run=client
If the dry run returns no errors, and we know our YAML is valid. Run the commands again without the --dry-run=client flag and lets get our deployment configured!
Once the deployments have been rolled out we can get the IP address of our 3 services:
@cloudshell:~ (fudge-deployment)$ kubectl get services
NAME              TYPE           CLUSTER-IP     EXTERNAL-IP   PORT(S)                      AGE
fudge-server-lb   LoadBalancer   10.40.2.39     [IP]      5001:31943/TCP               2m3s
kubernetes        ClusterIP      10.40.0.1      <none>        443/TCP                      11d
listener-http     LoadBalancer   10.40.2.99     [IP]     80:32652/TCP,443:31428/TCP   13s
listener-https    LoadBalancer   10.40.11.208   [IP]     80:32383/TCP,443:30262/TCP   13s
This output shows all of the information we need at this stage to begin a campaign. We can now create an implant which connects to either of our listener IP addresses and will forward our traffic on to mapped ports on our C2 server.
So whats next? Lets look at DNS, and then how to reconfigure a service/redirector if something goes wrong.
Configuring DNS
Ok so we’re targeting ACME Ltd, we’ve got our weaponised payload and we’re confident that we’ll get something beaconing back to us, but we’ve got an issue. What happens if need to reroll our redirector? We’ll lose our IP, and now we’ve got an implant calling back to an IP address we no longer own. Our client isn’t going to be a happy bunny.
Secondly without DNS, HTTP requests calling back to an IP address without a hostname, plainly put, is strange. Go have a look at your internet traffic when you’re browsing, how many direct IP connections are you seeing? Not many, if at all.
Setting up DNS can be done a few different ways, but here I’m going to look at 2 main routes, Terraform, and extending our YAML to automatically update our DNS. For this post I’m going to be using Cloudflare as the DNS provider, but most major DNS providers are supported.
For this blog post we’re going to make sure we disable Cloudflares proxy feature, to enable traditional DNS. The result will look like so:
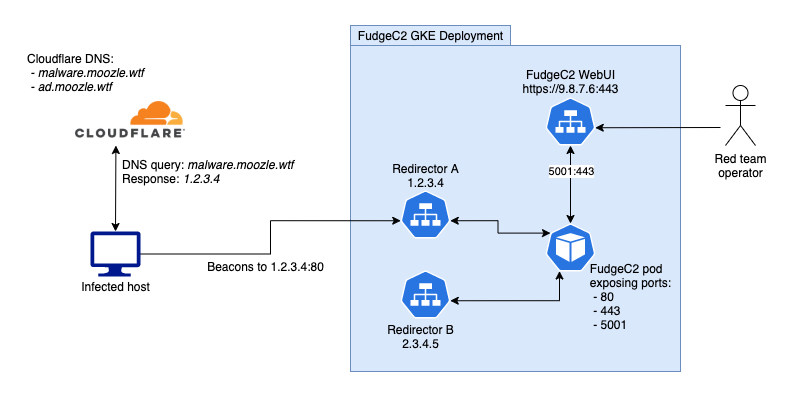
C2 infra using Cloudflare backed DNS, with 2 redirectors
Via Terraform
If you’ve not used Terraform before, you’ll quickly find it’s a hugely powerful tool for cloud orchestration. In fact this entire blog could have been written using Terraform, which would further simplify any cross cloud elements we might want (i.e. redirectors in AWS).
Terraform uses the provider context for each service, with the provider exposing functionality. We’ll be using the Cloudflare terraform provider, as can be seen below:
Ext_service.tf
provider "cloudflare" {
  email = "<YOUR EMAIL>"
  api_token = "<YOUR API_TOKEN>"
}

variable "domain" {
  default = "moozle.wtf"
}

resource "cloudflare_record" "malware" {
  zone_id  = "<ZONE ID>"
  name    = "malware"
  value   = "<SERVICE IP>"
  type    = "A"
  proxied = false
}
cd to the directory containing your terraform file and run:
terraform init
terraform apply
You’ll be prompted to confirm the changes and now we can check our Cloudflare DNS page to see our updated/created domain name ‘malware.moozle.wtf’.
The draw back to using Terraform like this is that we must manually update our DNS if the external IP address of our service changes. This is unlikely, but it only takes forgetting for a few hours to miss critical implant checkins.
Via External-DNS
Another tool that I’m a big fan of is External-DNS. External DNS works by setting up a deployment running within your GKE namespace, which your deployments can interact with during creation.
If you are deploying your external-DNS deployment in a non-GKE environment (or if you have disabled RBAC in GKE) you will need to use the deployment YAML for non-RBAC deployments which can be found on their GitHub page.
We’ll need to setup our External-DNS deployment which can be done using the default deployment YAML. You’ll need to update the highlighted values at the bottom of the ext-dns.yaml file.
ext-dns.yaml
apiVersion: v1
kind: ServiceAccount
metadata:
  name: external-dns
---
apiVersion: rbac.authorization.k8s.io/v1beta1
kind: ClusterRole
metadata:
  name: external-dns
rules:
- apiGroups: [""]
  resources: ["services","endpoints","pods"]
  verbs: ["get","watch","list"]
- apiGroups: ["extensions"]
  resources: ["ingresses"]
  verbs: ["get","watch","list"]
- apiGroups: [""]
  resources: ["nodes"]
  verbs: ["list"]
---
apiVersion: rbac.authorization.k8s.io/v1beta1
kind: ClusterRoleBinding
metadata:
  name: external-dns-viewer
roleRef:
  apiGroup: rbac.authorization.k8s.io
  kind: ClusterRole
  name: external-dns
subjects:
- kind: ServiceAccount
  name: external-dns
  namespace: default
---
apiVersion: apps/v1
kind: Deployment
metadata:
  name: external-dns
spec:
  strategy:
    type: Recreate
  selector:
    matchLabels:
      app: external-dns
  template:
    metadata:
      labels:
        app: external-dns
    spec:
      serviceAccountName: external-dns
      containers:
      - name: external-dns
        image: registry.opensource.zalan.do/teapot/external-dns:latest
        args:
        - --source=service # ingress is also possible
        - --domain-filter=moozle.wtf # (optional) limit to only example.com domains; change to match the zone created above.
        - --provider=cloudflare
        env:
        - name: CF_API_KEY
          value: "YOUR_CLOUDFLARE_API_KEY"
        - name: CF_API_EMAIL
          value: "YOUR_CLOUDFLARE_EMAIL"
Again, we run the kubectl create -f ext-dns.yaml command which will create our deployment. External-DNS is now ready to do the heavy lifting for us, but we need to update our services with new annotations, to create the DNS records we need.
To add a DNS record we need up update our services.yaml to include the enternal-dns annotations
apiVersion: v1
kind: Service
metadata:
  name: listener-http
  # Add and update the annotation value below
  annotations:
    external-dns.alpha.kubernetes.io/hostname: ads.moozle.wtf
  labels:
    app: fudge
spec:
  selector:
    app: fudge
  type: LoadBalancer
  ports:
  - name: http
    port: 80
    targetPort: 80
  - name: https
    port: 443
    targetPort: 443
Rerolling a Redirector
For some reason you’ve got a redirector you need to reroll, we’ve also got a DNS entry pointing to it.
Using kubectl we will delete the specific service. To do this we will list the service, find the service name, and run the delete command
kubectl delete service listener-http
Re-running our services.yaml file will not reroll our untouched services, and will only create the deleted previously deleted service ‘listener-http’.
If you have deployed your DNS through Terraform, or via your DNS providers WebUI you will now need to update the record, however, if you deployed using the External-DNS deployment (and it is still running) you will now see your DNS records match and everything has automatically aligned.
Cleaning up GKE
The cleanup process for GKE is simple, we simply delete our deployment and services using kubectl:
kubectl delete -f services.yaml
kubectl delete -f deployment.yaml
kubectl delete -f ext-dns.yaml
You should also be aware that your DNS is still resolving to the last known service IP address. I like to update all of my DNS records to point to localhost once I am finished using them.
If you’ve got any questions or comments, feel free to Tweet at me or DM me directly @ziconius!